
Baking Guides
How to Line a Cake Tin: Round, Square & Loaf Tins
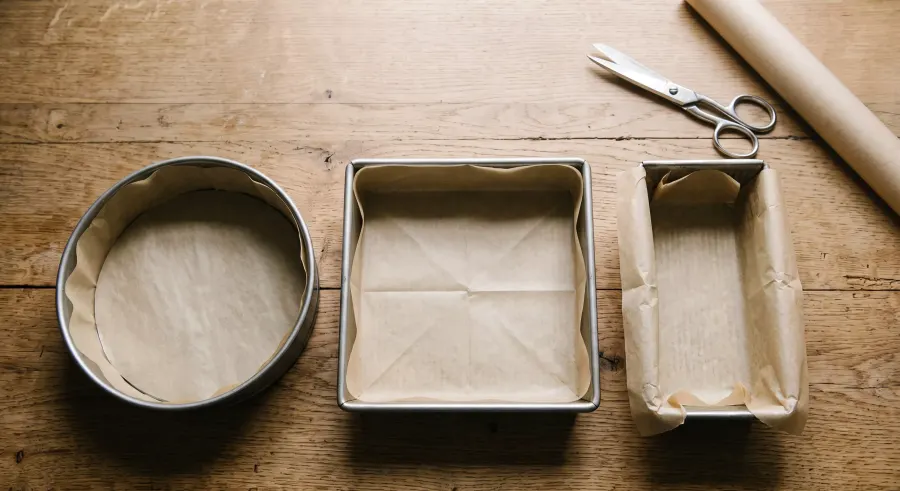
Lining a cake tin properly makes it easier to release a finished bake cleanly and helps keep the edges neat.
For most cakes, baking paper provides a non-stick layer between the mixture and the tin. A paper collar around the sides can also be useful for deeper cakes and longer bakes where the recipe calls for extra protection.
The best lining method depends on the shape of the tin, so a round tin, loaf tin and square tin do not all need to be prepared in exactly the same way.
What You Need to Line a Cake Tin
For most cake tins, you will need:
- baking paper or baking parchment suitable for oven use
- a small amount of butter or neutral oil for greasing
- scissors
- a pencil, if you want to trace the base of the tin
- a ruler, useful for measuring side strips
- the cake tin itself
In UK baking, the terms baking paper and baking parchment are commonly used for non-stick paper intended for oven use.
Do not assume that ordinary greaseproof paper or waxed paper is the same product. Check the packaging and use paper that is specifically suitable for baking at the temperature required by your recipe.
If you trace around the tin with a pencil, cut inside the line where practical and place the marked side against the tin rather than against the cake mixture.
Quick tip: A very thin layer of butter or oil helps hold baking paper against the tin while you add the cake mixture.
How to Grease and Line a Cake Tin
The exact method depends on the recipe, but this is a useful starting point for most ordinary cake tins.
Check the recipe first, as some bakes have their own specific greasing or lining instructions.
- Lightly grease the inside of the tin with a thin layer of butter or neutral oil.
- Cut baking paper to fit the base and, where needed, the sides.
- Press the paper neatly into position so that it lies flat against the tin.
- Smooth out loose creases and avoid bulky folds at the corners or joins.
- Add the cake mixture carefully so the paper does not shift.
The sections below show how to adapt this method for round, square, rectangular, loaf and removable-base tins.
How to Line a Round Cake Tin
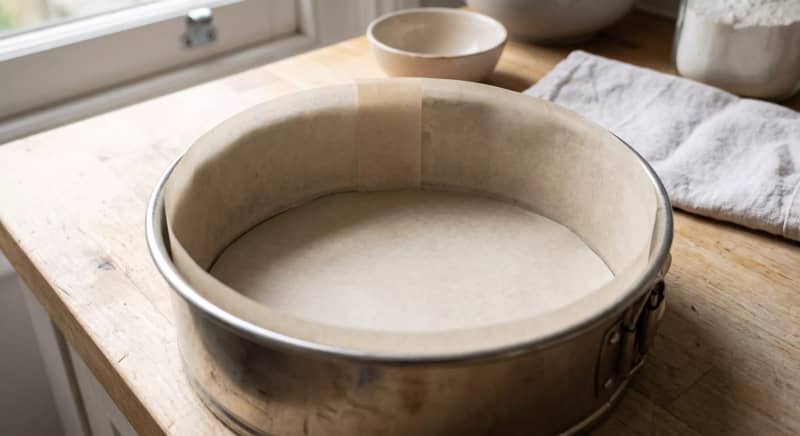
For a round cake tin, a separate base circle and side strip give a neat, reliable lining.
- Place the tin or its removable base on a sheet of baking paper.
- Trace around it and cut out a circle to fit the base.
- Cut a long strip of baking paper to line the inside wall of the tin.
- Lightly grease the inside of the tin.
- Press the paper circle flat against the base.
- Fit the strip around the sides and overlap its ends slightly so there is no gap.
- Smooth the paper against the greased surface before adding the mixture.
For many ordinary sponge cakes, the side paper only needs to reach approximately to the rim of the tin.
A deeper cake or a long-baked fruit cake may need a taller paper collar extending above the rim. Follow the individual recipe rather than automatically adding a tall collar to every cake.
How to Line a Square or Rectangular Cake Tin
There are two straightforward ways to line a square or rectangular tin.
You can use a piece for the base plus separate strips for the sides, or fold one larger sheet of baking paper into the tin.
Using separate pieces
- Cut a rectangle or square to fit the base.
- Cut strips for the sides.
- Lightly grease the tin.
- Press the base piece and side strips firmly into place.
- Keep the joins and corner overlaps as flat as possible.
Using one larger sheet
- Cut a sheet large enough to cover the base and rise up the sides.
- Press it into the tin and crease where the base meets the walls. If the corners will not sit neatly, make a straight slit from the outer edge of the paper towards the corresponding corner of the tin base, stopping at the corner rather than cutting across the base.
- Fold and overlap the resulting flaps neatly against the sides.
For brownies, traybakes or other bakes that will be lifted out before cutting, leaving some paper extending above two opposite sides can create useful handles.
Only do this where it suits the recipe and the tin.
How to Line a Loaf Tin
A simple baking-paper sling works well for many loaf tins.
- Cut a rectangle of baking paper wide enough to cover the base and run up the two long sides of the tin.
- Leave enough paper extending above those sides to make the baked loaf easier to lift out if appropriate.
- Lightly grease the tin so the paper stays in position.
- Press the paper firmly across the base and up the sides.
- If the recipe requires the short ends to be lined as well, add separate pieces of baking paper there.
- Avoid leaving large loose folds where batter can collect.
Let the loaf cool for the amount of time specified by the recipe before using the paper as lifting handles, as a very hot or delicate loaf may still be fragile.
How to Line a Cake Tin with a Removable Base
A loose or removable base makes a finished cake easier to release, but lining can still be useful.
- Cut a paper circle or square to fit the removable base.
- Lightly grease the tin to help hold the paper in place.
- Line the sides as well when the recipe asks for it.
- Keep bulky paper folds away from the join between the base and sides.
- Make sure the removable base is correctly seated before adding the mixture.
Remember that a removable or loose-base cake tin is not automatically leakproof.
If the batter is particularly runny, use the type of tin recommended by the recipe. Placing the tin on a baking tray can catch an occasional drip, but the tray does not seal a leaking tin.
Baking Paper vs Parchment Paper
In British recipes, you will most often see the terms baking paper or baking parchment.
American recipes commonly use the term parchment paper for the equivalent type of oven-safe non-stick lining paper.
So, if an American cake recipe asks you to line the tin with parchment paper, UK baking parchment or baking paper intended for oven use is normally what you need.
The more important distinction is between baking parchment and papers that are not designed as non-stick oven liners. Always check the manufacturer's packaging before putting any paper in the oven.
Should You Grease Baking Paper?
The main reason for greasing the tin before lining it is to help the paper stay flat and in position.
Many modern baking papers already have a non-stick surface, so they do not automatically need another layer of grease on top.
Some recipes do specifically ask you to grease the paper as well, and certain delicate cakes may benefit from that extra step.
Follow the individual recipe rather than assuming every lined tin should be prepared in exactly the same way.
How Far Above the Tin Should the Paper Sit?
For many everyday cakes, side lining that reaches the top of the tin or slightly above it is sufficient.
A taller collar can be useful for deeper cakes or long, slow bakes such as some fruit cakes, where the extra paper can help shield the upper edges from excessive browning.
There is no universal collar height that works for every cake.
If the recipe gives specific lining instructions, use those measurements.
Common Cake Tin Lining Mistakes
A few simple mistakes can make lining more awkward than it needs to be:
- using so much butter or oil that the paper slides around
- leaving large folds or bulky overlaps in corners
- allowing the paper to curl into the cake mixture
- cutting the base piece too large so it runs unevenly up the sides
- leaving gaps between pieces of side lining
- skipping side lining when the recipe specifically asks for it
- using paper that is not suitable for oven baking
- trapping thick folds around a removable base so it cannot seat properly
- assuming a loose-base tin is completely leakproof
- using a very tall paper collar when the recipe does not need one
Quick Guide by Tin Shape
| Tin Shape | Best Simple Lining Method | Useful Tip |
|---|---|---|
| Round | Base circle + side strip | Overlap the ends of the side strip slightly |
| Square | Base + side strips, or one folded sheet | Keep corner folds flat and tidy |
| Rectangular | Base + side strips, or a paper sling | Leave overhang on two opposite sides when useful for lifting |
| Loaf | Paper across the base and up the long sides | Leave a little overhang for lifting if appropriate |
| Removable-base round | Base circle, with sides lined when needed | Check the base is correctly seated before filling |
If you're changing the size or shape of tin as well as lining it, our cake tin conversion calculator can help you compare tin sizes before you bake.
Frequently Asked Questions
Should I grease a cake tin before lining it?
This little film is useful because it allows the baking paper to stick closely and flatten on the tin while you add in your mixture. If the recipe says otherwise, Follow to that.
Related Post: What tin can I bake a cake in?
Yes. We use ovensafe baking paper which we also call parchment for lining cake tins to give the finished cake a cleaner release.
I line a round cake tin?
The base a circle, the sides would be a strip to make the cylinder. Grease the tin lightly, place in base circle and press side strip around inside wall of the form with a slight overlap on end where it joins up.
How do I line a loaf tin?
Use for many loaf tins, have a sheet that covers the base and runs up two long sides. According to the recipe, if possible leave an inch or so paper above the sides - this way you get handy lifting handles.
Should I line a cake tin with removable base?
And while it is still helpful to line the bottom, especially with cakes that are prone to sticking. When the recipe says so, line at sides too.
The Bottom Line
You cannot always line the cake tin they all have there own lining method.
The circular bases and striped sides are most easily lined in a round tin, whereas square tins, rectangular or loaf ones can often be simply paper slung with folded sheets.
Do not use any other type of baking paper; keep folds and joins neat (same as with thick paper), follow recipe directions for adding ingredients – particularly if folding in dry, damp or wet). Taking a bit of care before you put the mixture into your tin means that releasing it afterwards is much easier!
Useful Tools for this Guide
- Use Tool: Cake Tin Conversion Calculator
Cake Tin Conversion Calculator
Resize cake recipes for different round, square, loaf and rectangular tins in cm or inches.